This article is to tell you how we are going to “add a phone number to iMessage on Mac”. Messaging is so demanding and became the necessity of our lives these days that is has become the basic purpose of any of the gadgets like mobile phones, laptops, etc…
It has minimized our time to call a person and talk to him/her by just sending a single message to convey our message whatever we want.
Like other companies, Apple is also providing its messaging services but it has some of its restrictions or you can say security to which we have to follow.
The phone number associated with your Apple ID can be added to your mac iMessage and it will work the same as it is being used from your iPhone.
The receiver will not be able to recognize that the message is either sent from your iPhone or the Mac. It is necessary to add a phone number in order to send or receive messages otherwise you will not be able to do so.
For that, this article is definitely going to help you if you are in search of the steps to add your phone number on your Mac.
How to add phone number to iMessage on Mac you need to follow some steps which are shown below:
- Go to Messages on your Mac
- The screen will appear on that you have to click the icon of Apple
- A menu bar will appear, click to “System Preferences”
- Then click on “iCloud’ to sign in with your Apple ID
- After signing in click to “Messages”
- Then you have to click on “Preferences” from the drop-down menu
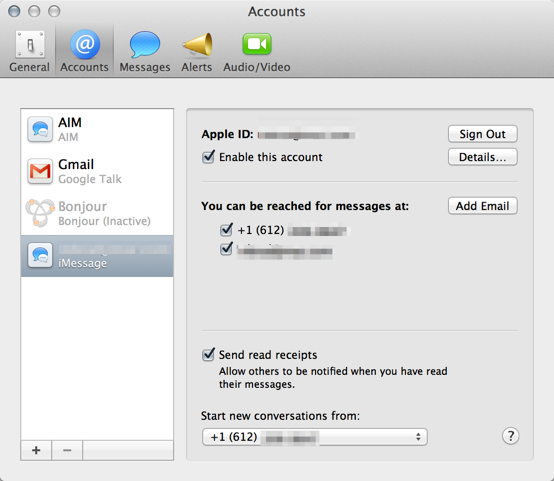
- Then a screen will appear like the picture below. You have to click on the “Accounts” the second icon on the screen of yours
- After clicking on Accounts, a screen will appear like this.
- iMessage will appear as highlighted above. Then you have to enable the account that you recently added for that select “Enable this account”, after which your number associated with that ID will appear along with your email addresses.
These were the steps to add your account along with your phone number on your Mac. Now after signing in to iCloud and adding a number you can now ON the iMessage from your MAC by following further simple steps more which I am going to show you.
Follow these steps to activate your iMessage from your Mac so you can be able to use the messaging services from Mac as well. The steps are as shown below:
- Go to “Settings” on your Mac and you have to scroll until you see “Messages” on your screen
- Once you find Messages. Click to “Messages” then you will see that a new screen will appear. On this, you have an option to turn ON or OFF the iMessage services. Simply click to turn on the iMessage that is already OFF. You have to turn it ON.
Note: It will ask you for your Apple ID if you are not signed in from iCloud. We are already signed in to iCloud from our Apple ID.
That is the reason we are not asked here to sign in and do not need to sign in again. Otherwise, it will ask you to sign in first which we have done it already in previous steps.
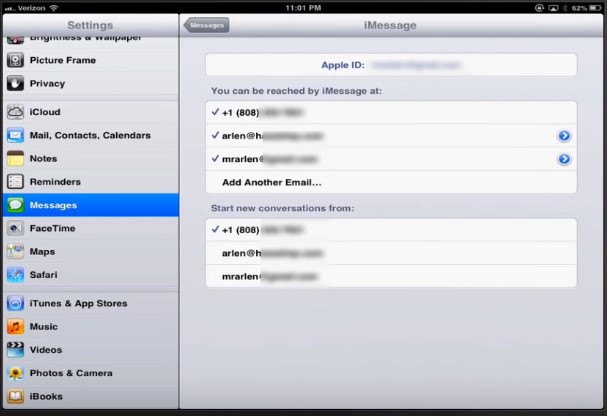
- Once you will ON your iMessage it will then take a few seconds to load then furthermore screen will appear something like shown below
- What you have to do now is go to “Send Read Receipts” and turn it ON your phone number with email addresses will appear which are associated with that account.
Now you are ready to use your Mac Messages application to send and receive messages. The steps are really simple and easy you just need to add your Apple ID first then need to activate the iMessage from your Mac to use it from Mac.
Then you ready to use the messaging service from your Mac as well and enjoy texting with your friends and family.
Read More Guide related to iMessage solutions On trendliff!


